
Netgear Router Login Guide (2026)

Netgear routers allow users to connect multiple devices to the internet while providing advanced features. Netgear routers come with different models. This router provides wireless connectivity and allows you to customize its settings. Users can log in to the admin panel and easily change the password, change the Wi-Fi name, manage connected devices, and update security settings
In this guide, you’ll understand how to log in to a Netgear router using the default 192.168.1.1 or 192.168.0.1 IP, change the login password, or fix login problems.
What is a Netgear router?
A Netgear router is a networking device that provides internet access and allows connecting multiple devices such as smartphones, laptops, and smart TVs to the same internet connection. A Netgear router comes with different models and is popular because it provides fast and reliable services, making it ideal for both business and personal use.
To customize Netgear router settings, users can log in to the admin panel using the default IP address on the router’s web address. You can easily change the WiFi name and password, manage connected devices, update security settings, and set up other control systems.
Netgear Router Login Steps
Logging into your Netgear router admin portal using the default IP can help users manage security updates, WiFi names, passwords, and many other settings. Follow these steps to access the router’s admin dashboard.
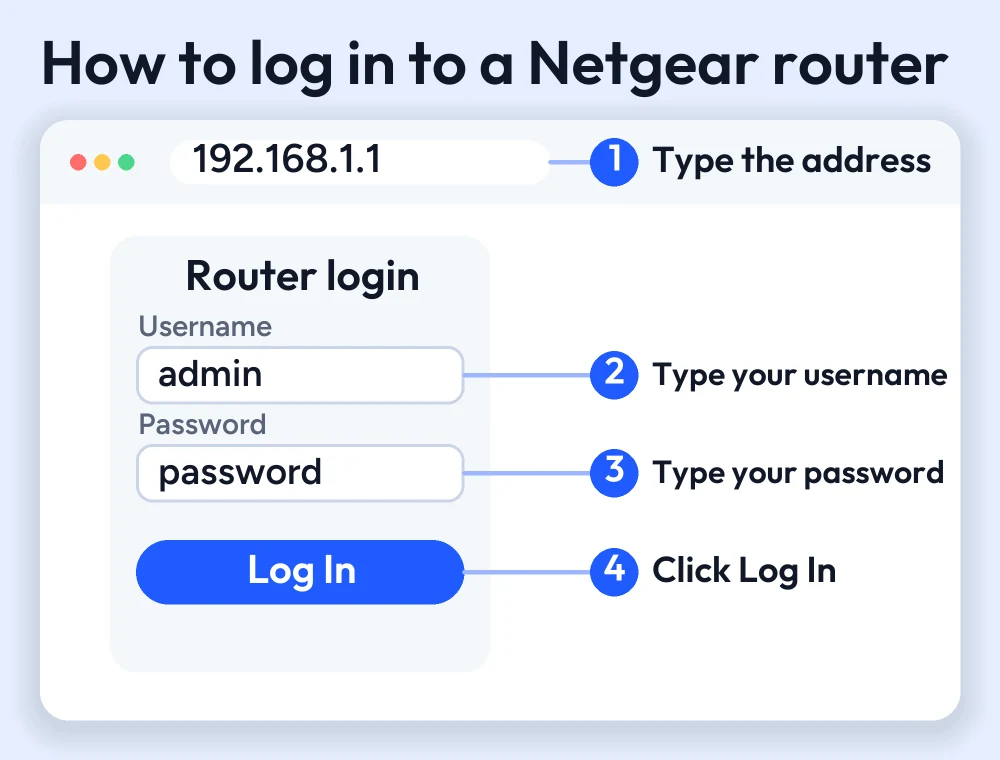
Log in to a Netgear Router Using a Web Browser
- Connect your phone, laptop, or other devices to the Netgear router
- Open a web browser such as (Chrome, Edge, or Safari)
- Type the default IP address, such as 192.168.1.1 or 192.168.0.1, into the address bar
- A Netgear login page appears on your screen
- Enter admin username and password
- Click the login button to access the Netgear admin dashboard
- Once logged in, you can now easily change your wifi name and password, update security, and manage connected devices
Common Default IP Addresses for Netgear Routers
Most of the time, Netgear admins use these IPs to log in to the admin panel. If one IP doesn’t work, try another or contact your Netgear admin for the correct IP, or check the label on the back of your router.
| Default IP address | username | password |
|---|---|---|
| 192.168.1.1 | admin | password |
| 192.168.0.1 | admin | password |
| 10.0.0.1 | admin | password |
How to Change Your Netgear Router Login Password
You can easily change your Netgear router login password by following these steps. Changing your password helps keep your network secure and prevents unauthorized users from accessing your portal.
- Connect your device to the Netgear router
- For a web browser, enter the default IP in the address bar
- Log in using your current credentials;
- Open the administration settings
- Select change password
- Enter current password
- Reenter the password to confirm it
- Apply on save login again using your new password
Recover your password.
If you forget your password, don’t panic; you can restore your password by using the password recovery feature. Follow these steps to reset your password
- Open the admin login page routerlogin.net or search the default IP in the address bar
- On the login page, click “Forgot Password”
- Answer the security question you created during the signup setup
- Follow the onscreen instructions
- Create a new admin password
- If password recovery is disabled, press and hold the reset button on the router for 15 seconds
- After that, log in using your new password
How to Restore Factory Settings on a Netgear Router
Restoring your Netgear router to factory settings can fix your login issue. If you do not know the security question, then the last option is to reset your router to factory settings, but keep this thing in mind when you reset your router to its factory settings, all your WiFi data, your custom settings, password, username, or even WiFi name will be lost.
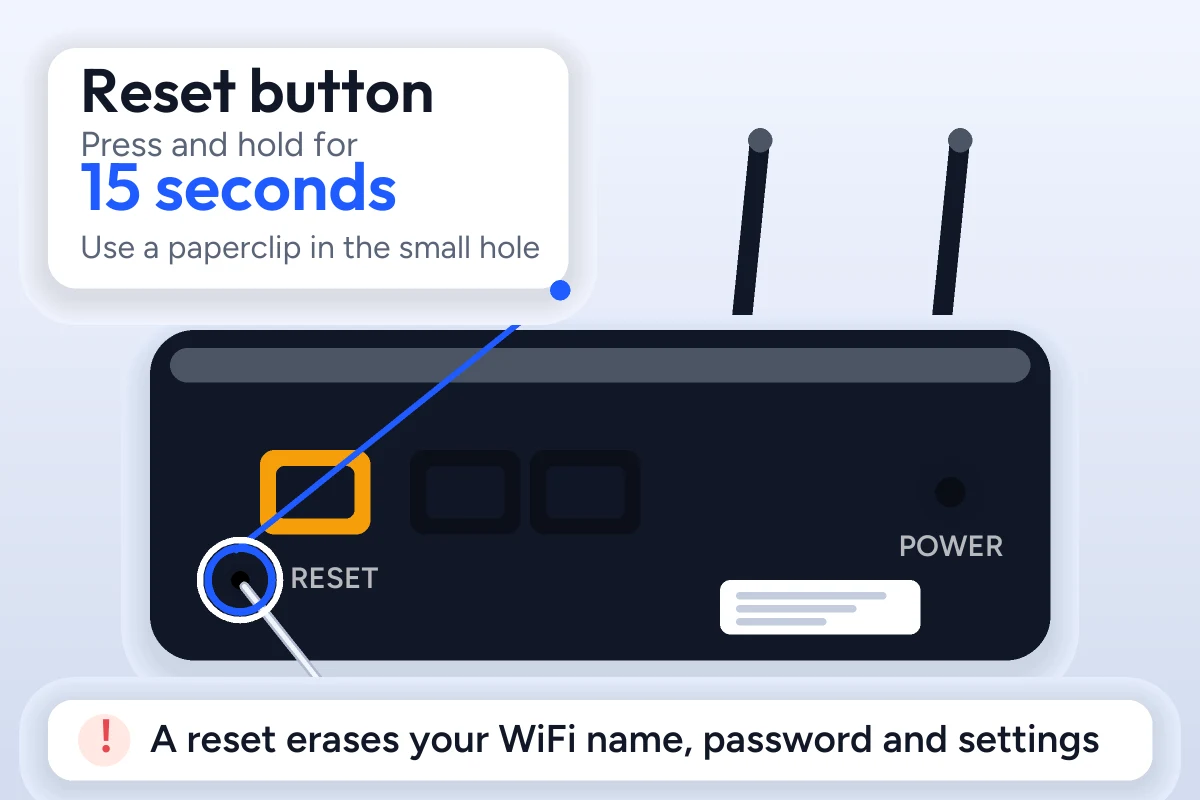
- Locate the reset button on the back or bottom of the router
- Press and hold the reset button for 15 seconds
- Release the button when the router’s light starts blinking again
- Wait a few minutes for the router to reset the factory settings.
- Open the admin login page to check the status
Trouble Logging In? Common Issues and Solutions
After password recovery, if you are still facing issues, make sure to understand these tips and solutions to solve your problems after recovery
- Check your internet connection; ensure that your device is connected to the Netgear router
- Verify the login IP address 192.168.1.1 or 192.168.0.1 in your browser’s address bar
- Clear browser cache
- If you face slow internet, restart your router for a few seconds.
Conclusion
The Netgear router is a popular wireless networking device that gives you full control over your home and office’s WiFi. You can easily log in to the admin portal using the default IP and credentials. From the dashboard, you can manage connected devices, change passwords, change usernames, update security settings, and manage troubleshooting common network problems. If you ever experience login problems or slow internet, resetting your router to factory settings can help prevent these issues, but on the other hand, it will completely erase your customized setup and settings. By following this guide, you’ll understand how to recover your lost password and set up amazing settings.
FAQs
How to Reset a Netgear Router?
Press and hold the reset button located on the bottom of the router for 15 seconds until the power light starts blinking. The router will restart and reset to the factory settings.
How to Connect to a Netgear Router?
Open the device's WiFi settings and connect to the Netgear network using the default name and password. Once connected, open the Netgear admin login portal to manage custom settings.
Is Netgear a Good Router?
Yes, Netgear is a popular and trusted router brand that comes with different models. People prefer Netgear because it provides secure internet, fast coverage, and advanced features for home and office internet.
How to Check a Netgear Router's Public IP Address?
Log in to the Netgear admin portal using login credentials. Open the internet or status option to check your public IP. You can easily check your public IP by visiting public IP checker websites.
How to Set DHCP DNS on a Netgear Router?
Log in to your Netgear portal, go to Advanced > Setup > Internet Setup, and enter your preferred primary and secondary DNS. Save the settings.
More router login guides
- ASUS router login guide
- Linksys router login guide
- TP-Link router login guide
- D-Link router login guide
- 192.168.1.1 login guide
Running a coin WiFi vending machine? Read the Piso WiFi 10.0.0.1 admin login guide and the Piso WiFi pause time guide, or go back to the Piso WiFi and router login guides hub.


